LVM by Example
In this post I’ll be discussing the fundamentals of the Logical Volume Manager in Linux, usually simply referred to as LVM. I’ve used LVM occasionally over the years, but for the most part I would just create a single big partition on my disk, toss XFS on it and call it a day. Recently that changed when I decided to replace my aging home media server with a new beast of a box that I wanted to do a lot more than simply serve up content. I knew I would need lots of storage, but didn’t necessarily know how I wanted to partition my disks ahead of time. I also wanted to move away from btrfs, which I never had a big problem with but I felt it would be better to use a more mainstream filesystem.
On top of having needs for media, I wanted this box to act as a private file share. My laptop, with only 500GB SSD, just isn’t big enough to hold my photos and videos I regularly shoot. A hundred thousand photos and videos taken with a 24 megapixel camera takes up a ton of space, and the videos I’m recording chew up even more space. Not only do I need lots of raw storage but I want fast access to the stuff I’m working with at the moment. SSD speeds access is important when accessing hundreds of files and I don’t want to be back in the days of slow spinning platters.
After a bit of soul searching and a ton of research I finally realized LVM would help me with all my needs. Instead of partitioning disks ahead of time and getting everything right the first time, I’ve decided to let LVM handle all the management of the disks. Not only can I trivially grow a partition but I can ensure I get fast access to my most frequently requested files by leveraging lvmcache.
To demonstrate basic LVM commands and usage I’ve launched an i3 spot instance and attached an additional 100GB EBS volume. The i3 instances have an NVMe drive which we would normally use as our primary storage, if this was a database server.
First, we can see our available devices by using the lsblk command. The xvdf and nvme0n1 are the two devices we can work with:
root@ip-172-30-0-151:~# lsblk
NAME    MAJ:MIN RM   SIZE RO TYPE MOUNTPOINT
xvda    202:0    0     8G  0 disk
└─xvda1 202:1    0     8G  0 part /
xvdf    202:80   0   100G  0 disk
nvme0n1 259:0    0 442.4G  0 disk
Gentle Overview
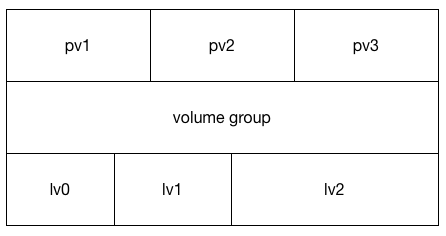
It’s important to understand three concepts when working with LVM.
- Physical Volumes
- Volume Groups
- Logical Volumes
Physical volumes are usually disks. Volume groups as a bunch of disks put together. Logical volumes are slices we can take from the volume groups. Here’s a crappy diagram that might help visualize what’s going on:
Creating Volumes and Filesystems
The first thing we need to do is create a Physical Volume. This initializes a disk for use with LVM. This will only take a second. This is simply telling LVM that we’ll be using the device later:
root@ip-172-30-0-151:~# pvcreate /dev/nvme0n1
  Physical volume "/dev/nvme0n1" successfully created
Once we’ve registered the disk for LVM usage, we can create our first Volume Group. A volume group can be associated with multiple physical volumes. You can think of a volume group as a pool of storage which we’ll later be able to allocate space in the form of logical volumes. Creating a volume group can be done using the vgcreate command. In the following example, I’ll create a volume group called “demo”, and add my first physical volume:
root@ip-172-30-0-151:~# vgcreate demo /dev/nvme0n1
  Volume group "demo" successfully created
The vgs command can be used to list all the volume groups. The -v flag gives us more verbose output. You’ll see we now have a single volume group called demo that’s the size of the entire NVMe drive:
root@ip-172-30-0-151:~# vgs -v
    Using volume group(s) on command line.
  VG   Attr   Ext   #PV #LV #SN VSize   VFree   VG UUID                                VProfile
  demo wz--n- 4.00m   1   0   0 442.38g 442.38g dPu5pq-mxMM-dZbu-8vc1-PYsc-Snhf-f5qNWk
Next we’ll create a logical volume using lvcreate. We can pass a size using the -L flag.
root@ip-172-30-0-151:~# lvcreate -L100G demo
  Logical volume "lvol0" created.
You can see above LVM has created a new volume and named it for us. We can have it use our own name by supplying the -n flag. We’ll probably want this most of the time:
root@ip-172-30-0-151:~# lvcreate -L100G -n mysecondlv demo
  Logical volume "mysecondlv" created.
When we view the logical volumes with lvs, we see the two volumes just created:
root@ip-172-30-0-151:~# lvs
  LV         VG   Attr       LSize   Pool Origin Data%  Meta%  Move Log Cpy%Sync Convert
  lvol0      demo -wi-a----- 100.00g
  mysecondlv demo -wi-a----- 100.00g
Now that we have a logical volume, we can put a filesystem on it. Let’s use XFS:
root@ip-172-30-0-151:~# mkfs.xfs /dev/demo/mysecondlv
meta-data=/dev/demo/mysecondlv   isize=512    agcount=4, agsize=6553600 blks
         =                       sectsz=4096  attr=2, projid32bit=1
         =                       crc=1        finobt=1, sparse=0
data     =                       bsize=4096   blocks=26214400, imaxpct=25
         =                       sunit=0      swidth=0 blks
naming   =version 2              bsize=4096   ascii-ci=0 ftype=1
log      =internal log           bsize=4096   blocks=12800, version=2
         =                       sectsz=4096  sunit=1 blks, lazy-count=1
realtime =none                   extsz=4096   blocks=0, rtextents=0
I’ll keep things simple and mount the volume at /root/myvolume. Note the total space reported by df output (trimmed for readability):
root@ip-172-30-0-151:~# mkdir myvolume
root@ip-172-30-0-151:~# mount /dev/demo/mysecondlv myvolume
root@ip-172-30-0-151:~# df -h
Filesystem                   Size  Used Avail Use% Mounted on
udev                          15G     0   15G   0% /dev
tmpfs                        3.0G  8.6M  3.0G   1% /run
/dev/xvda1                   7.7G  847M  6.9G  11% /
...
/dev/mapper/demo-mysecondlv  100G   33M  100G   1% /root/myvolume
We can remove the first volume (the one we let LVM name) easily using lvremove:
root@ip-172-30-0-151:~# lvremove /dev/demo/lvol0
Do you really want to remove and DISCARD active logical volume lvol0? [y/n]: y
  Logical volume "lvol0" successfully removed
Expanding a Volume
We have a ton of free space on our demo volume group. Let’s give our filesystem a little more space to work with. The lvextend command lets us grow a volume. We can specify a relative size with the -L flag by prefixing a size with a +. For instance, we can grow the LV by 50GB by doing the following:
root@ip-172-30-0-151:~# lvextend -L +50G demo/mysecondlv
  Size of logical volume demo/mysecondlv changed from 100.00 GiB (25600 extents) to 150.00 GiB (38400 extents).
  Logical volume mysecondlv successfully resized.
We’ve increased the volume size but the filesystem won’t know to take advantage of the new space. We can use xfs_growfs to take over the rest of the available space. It’s an online operation, no need to unmount:
root@ip-172-30-0-151:~# xfs_growfs myvolume
meta-data=/dev/mapper/demo-mysecondlv isize=512    agcount=4, agsize=6553600 blks
         =                       sectsz=4096  attr=2, projid32bit=1
         =                       crc=1        finobt=1 spinodes=0
data     =                       bsize=4096   blocks=26214400, imaxpct=25
         =                       sunit=0      swidth=0 blks
naming   =version 2              bsize=4096   ascii-ci=0 ftype=1
log      =internal               bsize=4096   blocks=12800, version=2
         =                       sectsz=4096  sunit=1 blks, lazy-count=1
realtime =none                   extsz=4096   blocks=0, rtextents=0
data blocks changed from 26214400 to 39321600
Checking df again we see our filesystem has increased capacity:
root@ip-172-30-0-151:~# df -h
Filesystem                   Size  Used Avail Use% Mounted on
udev                          15G     0   15G   0% /dev
tmpfs                        3.0G  8.6M  3.0G   1% /run
/dev/xvda1                   7.7G  847M  6.9G  11% /
...
/dev/mapper/demo-mysecondlv  150G   33M  150G   1% /root/myvolume
Now we’ve gone through the exercise of creating physical volumes, volume groups, and logical volumes. Let’s remove the volume group we just created using vgremove. Note we have to unmount the volume first. If we don’t, LVM will complain:
root@ip-172-30-0-151:~# umount myvolume
root@ip-172-30-0-151:~# vgremove demo
Do you really want to remove volume group "demo" containing 1 logical volumes? [y/n]: y
Do you really want to remove and DISCARD active logical volume mysecondlv? [y/n]:
Do you really want to remove and DISCARD active logical volume mysecondlv? [y/n]: y
  Logical volume "mysecondlv" successfully removed
  Volume group "demo" successfully removed
At this point, we’ve created (and removed) physical volumes, volume groups, logical volumes, and put a filesystem on a LV. We’ve also expanded the filesystem on the fly, which can be pretty handy.
Using SSD Cache with Spinning Rust
Let’s take a look at something a little more complex. Next we’ll create a logical volume on a spinning disk, using the SSD to cache the most frequently used blocks. Then we’ll tie it all together and create a filesystem.
First we’ll ensure we have two physical volumes. We’ve only used the NVMe drive so far, so I’ll go ahead and prepare the slower EBS volume (referred to as origin) for use:
root@ip-172-30-0-151:~# pvcreate /dev/xvdf
  Physical volume "/dev/xvdf" successfully created
Note: Yes, I am using a smaller drive for my origin volume than the cache volume. This is only to save on cash in case I forgot to destroy it later. Normally your origin volume is much larger than your cache.
Then we’ll need to create a new volume group with the two physical volumes added to it. Using LVM’s block caching requires all of the volumes to be in the same volume group.
root@ip-172-30-0-151:~# vgcreate demo /dev/nvme0n1 /dev/xvdf
  Volume group "demo" successfully created
The vgdisplay command can tell us a lot about the volume we’ve just created. Note the two physical volumes at the end.
root@ip-172-30-0-151:~# vgdisplay -v
    Using volume group(s) on command line.
  --- Volume group ---
  VG Name               demo
  System ID
  Format                lvm2
  Metadata Areas        2
  Metadata Sequence No  1
  VG Access             read/write
  VG Status             resizable
  MAX LV                0
  Cur LV                0
  Open LV               0
  Max PV                0
  Cur PV                2
  Act PV                2
  VG Size               542.37 GiB
  PE Size               4.00 MiB
  Total PE              138847
  Alloc PE / Size       0 / 0
  Free  PE / Size       138847 / 542.37 GiB
  VG UUID               pxg3mf-Tdko-om17-Hs66-R4uZ-0MaG-2xoo19

  --- Physical volumes ---
  PV Name               /dev/nvme0n1
  PV UUID               HsreBN-6Low-fygm-mCWC-cAXe-NJrl-21PYwU
  PV Status             allocatable
  Total PE / Free PE    113248 / 113248

  PV Name               /dev/xvdf
  PV UUID               Mrltt7-BBi2-1ded-dRAQ-98GA-dsXc-fsaHQs
  PV Status             allocatable
  Total PE / Free PE    25599 / 25599
Now that we have our two disks in the volume group, we can set up the cache and origin (slow disk). First, create the volume for the origin. Note that I’m explicitly specifying the slower drive, /dev/xvdf for my origin:
root@ip-172-30-0-151:~# lvcreate -n slow -L80G demo /dev/xvdf
  Logical volume "slow" created.
For the cache, we’ll need two volumes. One for the cache itself, and one for the cache metadata. According to the man page
The size of this LV should be 1000 times smaller than the cache data LV, with a minimum size of 8MiB.
I was feeling lazy so I used convenient numbers. Yes, I’m wasting space:
root@ip-172-30-0-151:~# lvcreate -n cache -L20G demo /dev/nvme0n1
  Logical volume "cache" created.

root@ip-172-30-0-151:~# lvcreate -n meta -L 1G demo /dev/nvme0n1
  Logical volume "meta" created.
All three volumes can be seen by lvs:
root@ip-172-30-0-151:~# lvs -a demo
  LV    VG   Attr       LSize  Pool Origin Data%  Meta%  Move Log Cpy%Sync Convert
  cache demo -wi-a----- 20.00g
  meta  demo -wi-a-----  1.00g
  slow  demo -wi-a----- 80.00g
We need to tell LVM to create a cache pool. lvconvert is the command we’ll use for that. We tell LVM which volume to use as our cache and which to use as our meta:
root@ip-172-30-0-151:~# lvconvert --type cache-pool --poolmetadata demo/meta demo/cache
  WARNING: Converting logical volume demo/cache and demo/meta to pool's data and metadata volumes.
  THIS WILL DESTROY CONTENT OF LOGICAL VOLUME (filesystem etc.)
Do you really want to convert demo/cache and demo/meta? [y/n]: y
  Converted demo/cache to cache pool.
Now that we’ve converted our cache and meta volumes into a cache pool, they’ll no longer show up when we use lvs alone. We’ll need to pass the -a flag:
root@ip-172-30-0-151:~# lvs -a
  LV              VG   Attr       LSize  Pool Origin Data%  Meta%  Move Log Cpy%Sync Convert
  cache           demo Cwi---C--- 20.00g
  [cache_cdata]   demo Cwi------- 20.00g
  [cache_cmeta]   demo ewi-------  1.00g
  [lvol0_pmspare] demo ewi-------  1.00g
  slow            demo -wi-a----- 80.00g
Next we associate the cache pool with the slow volume:
root@ip-172-30-0-151:~# lvconvert --type cache --cachepool demo/cache demo/slow
  Logical volume demo/slow is now cached.
Now we can create our filesystem:
root@ip-172-30-0-151:~# mkfs.xfs /dev/demo/slow
meta-data=/dev/demo/slow         isize=512    agcount=16, agsize=1310704 blks
         =                       sectsz=512   attr=2, projid32bit=1
         =                       crc=1        finobt=1, sparse=0
data     =                       bsize=4096   blocks=20971264, imaxpct=25
         =                       sunit=16     swidth=16 blks
naming   =version 2              bsize=4096   ascii-ci=0 ftype=1
log      =internal log           bsize=4096   blocks=10240, version=2
         =                       sectsz=512   sunit=16 blks, lazy-count=1
realtime =none                   extsz=4096   blocks=0, rtextents=0
We’ll mount the drive somewhere convenient:
root@ip-172-30-0-151:~# mkdir whatever
root@ip-172-30-0-151:~# mount /dev/demo/slow whatever/
root@ip-172-30-0-151:~/whatever# df -h
Filesystem             Size  Used Avail Use% Mounted on
udev                   7.5G     0  7.5G   0% /dev
tmpfs                  1.5G  8.5M  1.5G   1% /run
/dev/xvda1             7.7G  848M  6.9G  11% /
tmpfs                  7.5G     0  7.5G   0% /dev/shm
tmpfs                  5.0M     0  5.0M   0% /run/lock
tmpfs                  7.5G     0  7.5G   0% /sys/fs/cgroup
tmpfs                  1.5G     0  1.5G   0% /run/user/1000
/dev/mapper/demo-slow   80G   33M   80G   1% /root/whatever
At this point we now have the ability to leverage the cost effectiveness of large slow spinning drives, while getting the performance of SSDs for the data we access most frequently. There’s quite a bit more to LVM to explore, much more than I can cover in a single coherent post. In a future post, I’ll show how to create more complex disk arrangements, take snapshots, and benchmark your configuration. If this post has been helpful, please reach out on Twitter, I’m @rustyrazorblade!
If you found this post helpful, please consider sharing to your network. I'm also available to help you be successful with your distributed systems! Please reach out if you're interested in working with me, and I'll be happy to schedule a free one-hour consultation.